Docs · Get started
Install and first run
The nightcap command sets up the server for you, one question at a time. The Install page has the full picture.
- Copy the install line from the Install page into a terminal (macOS or Linux). On Windows, download the
.exe from Releases. - Type
nightcap and choose Set up a new server. - Pick where it runs. For a home, pick This computer. It needs Docker.
- For the database, choose Make one for me. Paste your free TMDB key (it is checked on the spot) and give the server a name.
- Check the review screen. Nothing is made until you choose Set it up.
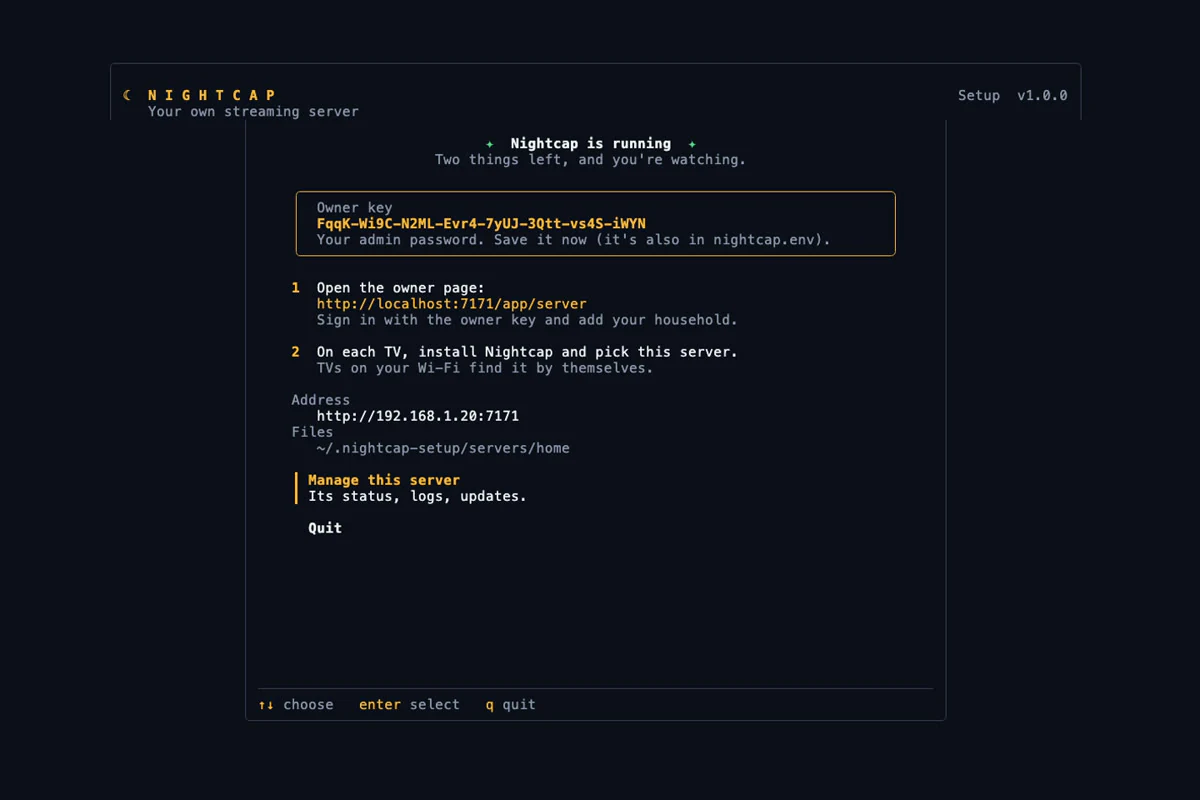
- When it says Nightcap is running, save the owner key in the gold box. It is your admin password for the owner page.
The setup also shows the server’s address and the two things left to do: make a household, then add your TVs.
Next: Make your household →Docs · Get started
Make your household
A household is one family: its own profiles, TVs, sources and settings. One server can hold several.
- Open the owner page. The setup shows its link, which ends in
/app/server. In nightcap you can also choose Open owner page. - Sign in with the owner key.
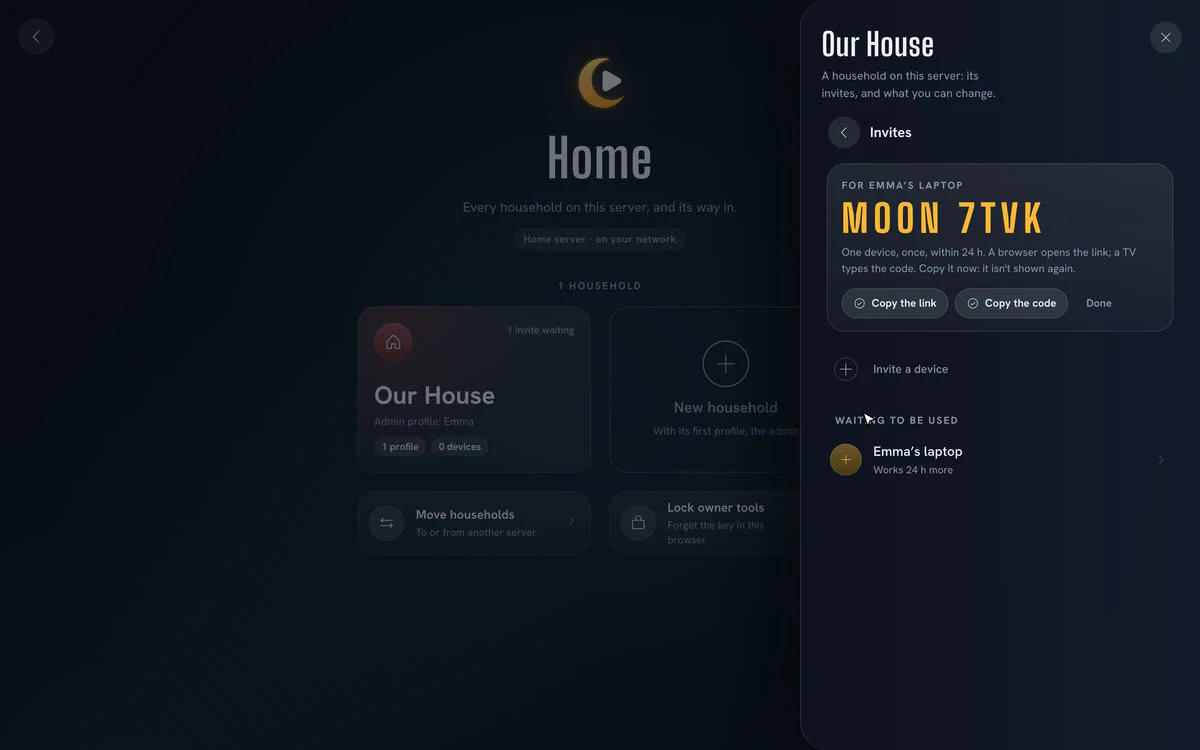
- Choose New household. Type its name, its admin profile (the person who looks after it) and a name for its first device: the admin’s browser, like “Alex’s laptop”.
- Choose Make it and open the invite link in that browser. It works once, within 24 hours.
- Nightcap opens as the admin. From there, Settings, then Household, then Invites makes an invite for each TV.
On a home server, TVs and browsers can also just pick the household from a list. Invites are for servers in the cloud, or to name a device.
Next: Put it on a TV →Docs · Get started
Put it on a TV
Nightcap has apps for Android TV, Samsung and LG. They all look and work the same.
- Install the Nightcap app on the TV. The TV apps page shows how for each brand.
- Android TV at home: the app looks on your Wi-Fi and shows your server. Pick it.
- Samsung or LG, or a server on Docker Desktop: type the server’s address once, like
http://192.168.1.20:7171. The setup’s last screen shows it. - A server in the cloud: type its
https:// address, then the household’s 8-character join code. - Pick your household, then pick yourself on Who’s watching?
Samsung and LG open the TV app from your server, so they update whenever the server does.
Next: Add profiles →Docs · Your household
Add profiles
Each person gets a profile: their own Home, history, My List, languages and picture quality.
- In a browser, open Nightcap as the admin profile. Go to Settings, then the Household tab.
- The first time, set an admin PIN (4 to 8 digits). It keeps household settings to the admin.
- Open Profiles and choose Add profile. Type a name and pick an avatar.
Up to six profiles by default. You can add one from a TV too.
Next: Add your sources →Docs · Your household
Add your sources
A source is an add-on or a service that finds films and shows for your household. Add several, and Nightcap picks the best version of each title to play. The household admin chooses them.
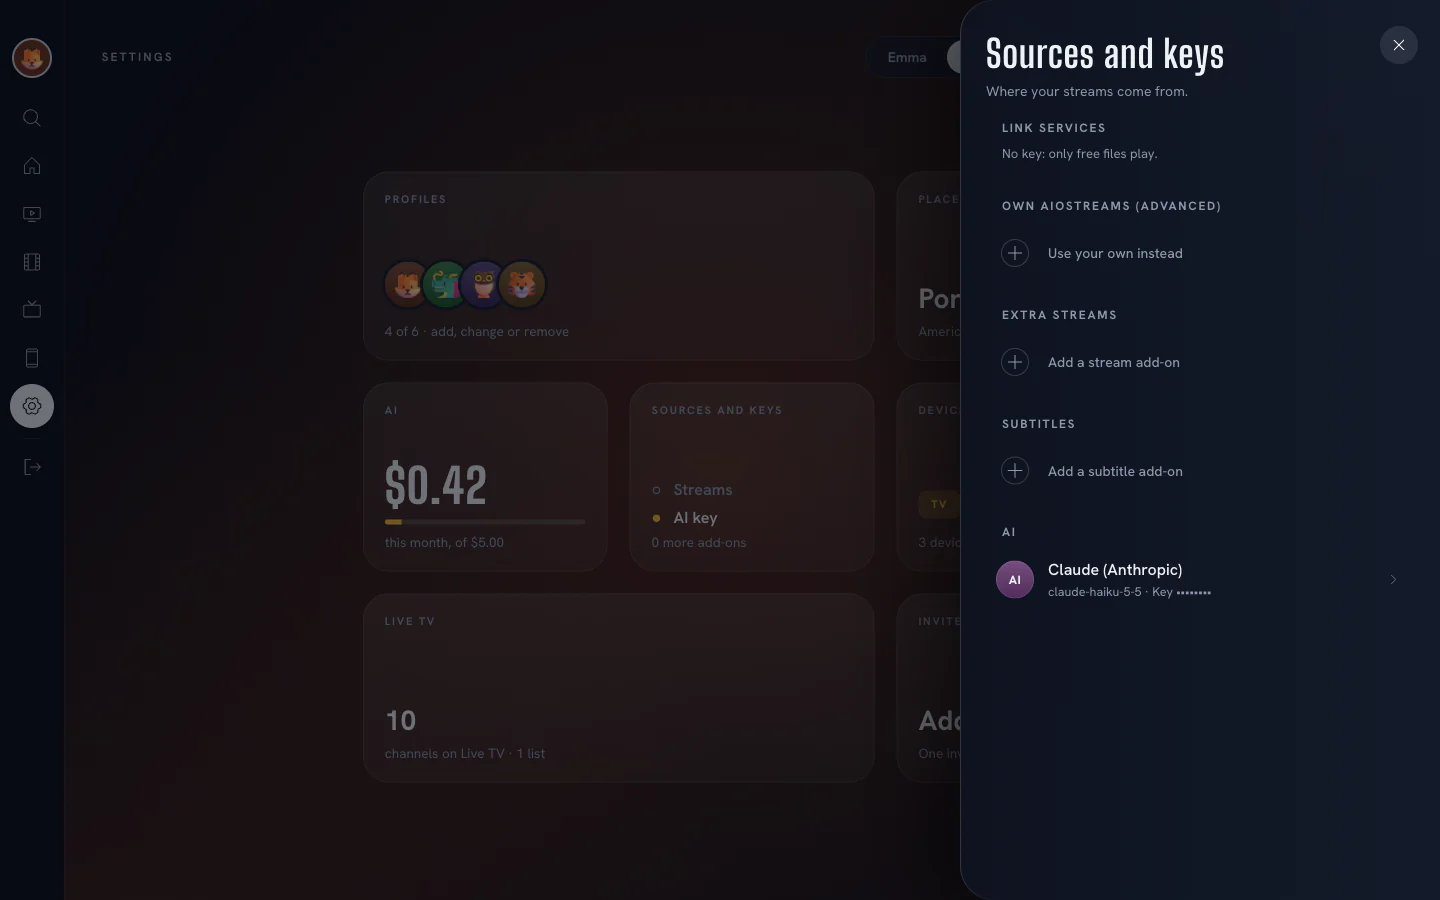
- Open Settings, then Household, then Sources and keys.
- Add what you use: stream and subtitle add-ons by their address, a key for a service you have an account with, or the address of your own source finder.
- Choose Test on each one to check it answers.
Add sources you have the right to use. Keys are stored encrypted on your server and are never sent to the TVs.
Next: Live TV →Docs · Your household
Live TV
Watch channels from your own channel lists (M3U playlists), on the TVs and in the browser.
- Open Settings, then Household, then Live TV. Add a list by its address. Up to 5 lists.
- Nightcap reads the list at once. Choose how often it reads it again: every 15 minutes, every hour, every 6 hours or once a day.
- Pick which countries and languages to show.
- Open Live TV from the menu. Channels sit in rows by kind, and you can keep favourites in My channels.
A channel that won’t play hides itself on that TV for 7 days. You can try it again from Browse all.
Next: AI picks and Smart Search →Docs · Your household
AI picks and Smart Search
Optional. With your own AI key, Nightcap builds Home rows for each person, says why it picked each title, and lets you search in plain words.
- In Sources and keys, choose Add an AI: Claude, OpenAI, OpenRouter, or any OpenAI-compatible address, including one on your own machine.
- Pick a model from the list your key can use, then choose Test. A test costs a fraction of a cent.
- Open AI and set a Monthly limit. At the limit only the AI pauses. Everything else keeps working.
No key? Home is still ranked from each person’s taste. If Nightcap doesn’t know a model’s price, type it in, or the monthly limit can’t count that model.
Next: Watch in a browser, play on a TV →Docs · Everyday
Watch in a browser, play on a TV
Any browser, on a laptop or a phone, is a Nightcap screen and a remote for your TVs.
- Open the server’s address with
/app on the end, like http://192.168.1.20:7171/app. - At home, pick your household. For a cloud server, open the invite link the admin sent you.
- Pick your profile.
- To watch on a TV, choose Play on TV on a title. The TV asks “Name wants to play”. Choose Play on the TV.
Progress is shared, so you can start on the laptop and finish on the TV. Sent to TV plays any video link on a TV.
Next: Update, restart, logs, stop and remove →Docs · Running it
Update, restart, logs, stop and remove
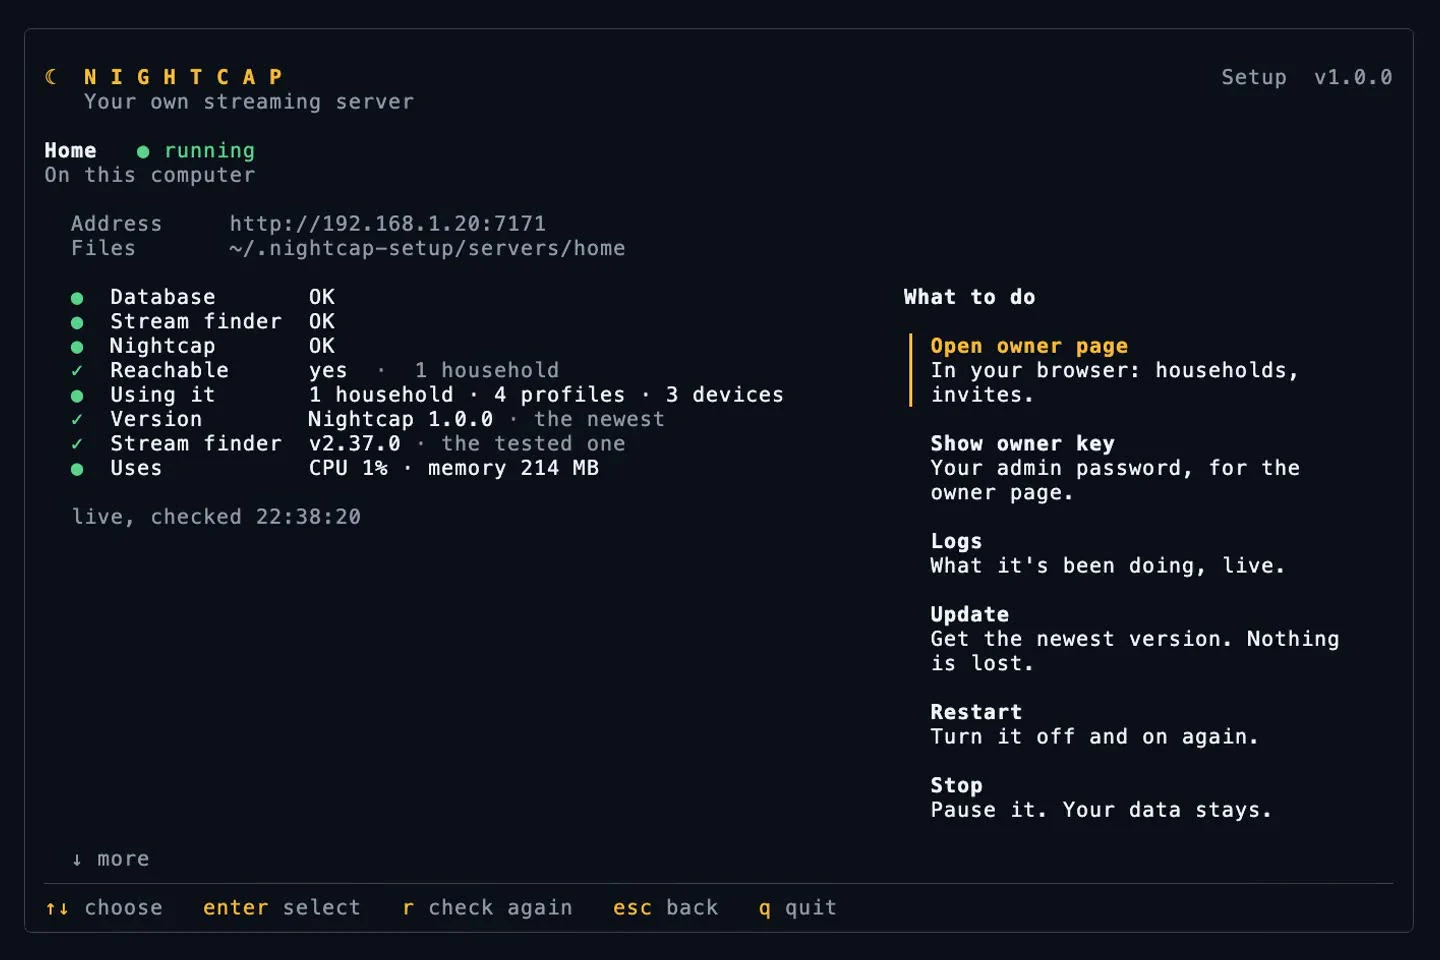
Type nightcap again and choose Manage your servers. Pick a server to see how it’s doing, live.
- Update gets the newest version. Nothing is lost.
- Restart turns it off and on again.
- Logs shows what it’s doing, live. Press e for errors and warnings only, and / to find a word.
- Stop pauses it and keeps your data. Start brings it back. On Google Cloud there is no Stop: it only runs while someone watches.
- Remove deletes it, and the database it made, for good. You type its name to confirm. A database you brought yourself is kept.
To update the nightcap command itself, run nightcap update (macOS and Linux).
Next: Watch away from home →Docs · Running it
Watch away from home
A server on this computer is for your home Wi-Fi. For family in other places, run it on Google Cloud.
- In
nightcap, pick Google Cloud. You need the Google Cloud CLI (gcloud), signed in, with billing on. - Choose I already have one for the database and paste the address of a Postgres you can reach online. Neon and Supabase have free plans.
- Pick a region (the best three are marked) and check the cost on the review screen. It stays low because the server only runs while someone watches.
- In the web app, as the household’s admin, make an invite for each TV or phone (Settings, Household, Invites). Each one joins with its code.
Moving an existing household? On the owner page, Move households saves it to a password-locked file you load on the new server. TVs carry on once they have the new address.
Next: Run your own add-ons (plugins) →Docs · Running it
Run your own add-ons (plugins)
A plugin is an add-on you run next to your server, as one more container: on this computer, in the same cluster or in the same Google Cloud project. nightcap starts it, keeps it with the server, and removes it with the server. Nightcap comes with no plugins: you bring the add-on.
- Describe the add-on in a small file in
~/.nightcap-setup/plugins/, like the one below. - In
nightcap, open your server, choose Plugins, then Add a plugin. It asks each setting on its own screen and makes the ones marked made. - When it’s done, it shows the add-on’s address. As the household’s admin, add it under Settings, Household, Sources and keys.
- Update gets its newest image, Show address shows the address again, and Remove takes it away.
# ~/.nightcap-setup/plugins/my-addon.yaml
name: My add-on
image: docker.io/you/my-addon:1.0.0
port: 8080                      # given to it as PORT
addon: /{TOKEN}/manifest.json   # its add-on address, after the host
settings:
  - name: TOKEN
    made: true                  # nightcap makes a random one
    secret: true
  - name: API_KEY
    ask: Your API key for this add-on
    secret: true                # typed as dots, kept out of logs
  - name: LANGUAGE
    ask: Language, like en
    optional: true
- On Google CloudIt runs as its own service, sleeping while unused, and its cost is added to the server’s.
memory, cpu, max_instances (up to 10), concurrency and timeout set its size. - On this computerIt joins the server’s Docker services, so Start, Stop and Logs include it.
- On KubernetesIt runs in the server’s namespace, with its settings kept in a Secret.
Run only add-ons you trust and have the right to use. A plugin runs inside your server’s own network.
Next: Troubleshooting →Docs · Help
Troubleshooting
The usual problems, and what to do.
- The TV can’t find the server
- Only the Android TV app looks on the Wi-Fi, and only for a server on Linux Docker or Kubernetes. Otherwise, type the address on the TV once:
http:// and the computer’s address, then :7171. The TV and the server must be on the same network. - I use Docker Desktop (Mac or Windows)
- TVs can’t find a server there by themselves. Type its address on each TV once. The setup warns you on its review screen and shows the address at the end.
- The TV says “That address isn’t secure”
- A server outside your home needs an
https:// address. Google Cloud gives you one. - It says “Waking up Nightcap…”
- A Google Cloud server sleeps when no one is watching. It wakes in about 15 seconds.
- I lost the owner key
- In
nightcap, open the server and choose Show owner key. It is also in nightcap.env in the server’s folder. - Someone forgot the admin PIN
- On the owner page, open the household and choose Reset the admin PIN.
- “Docker Compose isn’t here”
- It comes with Docker Desktop. On Linux, install the
docker-compose-plugin package. - Something else
- In
nightcap, open the server, choose Logs and press e. Passwords are hidden. Everything the setup did is in setup.log in the server’s folder.
Next: Where things are kept →Docs · Help
Where things are kept
Your server, your data. There is no Nightcap account and no tracking.
- Households and historyProfiles, history, ratings and settings live in your server’s Postgres database. One made for you on this computer is reachable from this computer only.
- Keys and sourcesStored encrypted in that database, and shown masked.
- The server’s files
~/.nightcap-setup/servers/<name>: the Compose file, nightcap.env (with the owner key) and setup.log. Only you can read them. - Your list of servers
~/.nightcap-setup/servers.json. No keys in it. - VideosPlay from where they are hosted straight to your screen. Your keys never reach the TVs.
- Taking it with youMove households on the owner page saves one or all households to a password-locked file.
Still stuck? Ask on GitHub.